
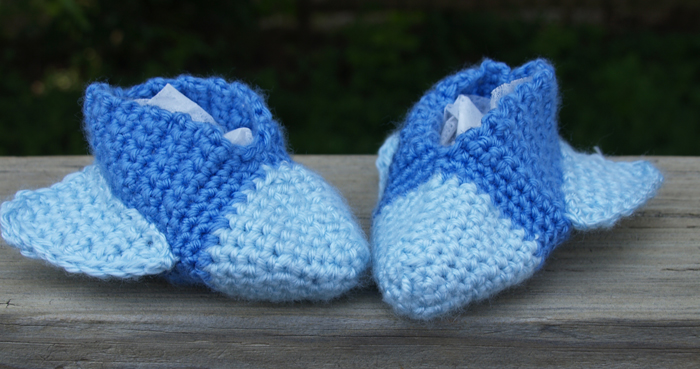

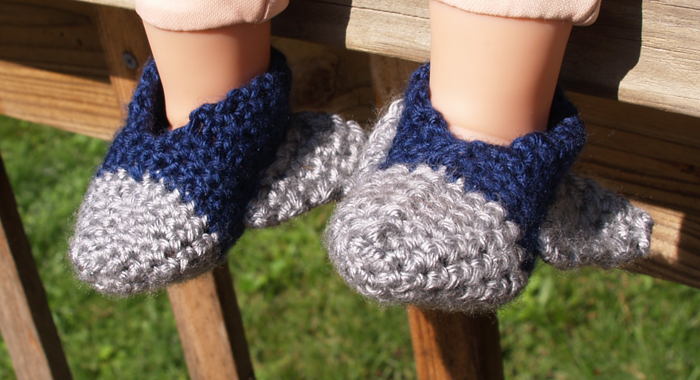
Rocket Shoes
Sizes Newborn - Toddler
Suggested Hook Sizes (I work fairly tightly when I crochet. If you work looser, go down a hook size. If you work even tighter than I do, go up one)
Newborn - G
0-3 months - H (will follow same directions as Newborn)
3-6 months - G
6-12 months G
Toddler - H
Instructions are given for sizes Newborn, 0-3 months with instructions for larger sizes in parentheses and color)
The width sizing is pretty flexible, so much of the size changes comes in increasing the length.
Materials
Less than 75 yards each of two colors. One for the body and a contrast for the fins and nose
For the shoes pictures I used Simply Soft. It’s a size  yarn, but that can be a prety wide range. I find it to be thinner than many in the same category. You won’t need a large amount of either colors. I find that I can get several pair of shoes from a single skein.
yarn, but that can be a prety wide range. I find it to be thinner than many in the same category. You won’t need a large amount of either colors. I find that I can get several pair of shoes from a single skein.
Stitches needed
ch - chain
sc - single crochet
sc2tog - single crochet 2 together
ss - slip stitch
sliding/adjustable loop
Nose
Starting with contrast color make a sliding/adjustable loop
5 (5, 6) sc in loop
jon at first sc with ss
Round 1
ch 1,2 sc same stitch
2 sc each stitch around
join with ss to first sc
Round 2
ch 1 sc same stitch
sc around
join with ss to first sc
Round 3
ch 1, 2 sc same stitch
sc next stitch
*2 sc next stitch
sc next stitch
repeat from * around
join with ss to first sc
Round 4
ch 1 sc same stitch
sc around
join with ss to first sc
Round 5 for Newborn - 0-3 months
ch 1 sc same stitch
sc around
break off yarn and join body color
Round 5 for all other sizes
ch ,1 2 sc same stitch
sc next 2 stitches
* 2 sc next stitch
sc next 2 stitches
repeat from * around
join with ss to first sc
Round 6
ch 1 sc same stitch
sc around
join with ss to first sc
break off yarn and join body color
Body
Round 1 & 2
ch 1, sc same stitch
sc around
join with ss to first sc.
From here on the body is worked in rows.
Row 3
ch 1, sc same stitch
sc across
Repeat row 3 until entire shoe measures
3 ¾ for newborn,
4” for 0-3 months
4 ½ “ for 3-6 months
5” for 6- 12 months
5 ½ “ for Toddler 12 - 24 months
6” for Toddler 24 - up
These may appear long, but part of the nose isn’t really usable for feet. Make even larger sizes by adding to the length and/or an extra increase in rounds on the nose.
fasten off yarn, leaving long tail for sewing.
DO NOT SEW THE BACK SEAM YET.
Fins (make 2)
With contrast color (or a third color if that’s your whim)
Newborn - 0-3 months
Ch 6
Row 1
sc in second ch from hook
sc across
Row 2
ch 1 sc in same stitch
sc across
Row 3
ch 1 sc in same stitch
sc next 2 stitches
sc2 tog
Row 4
ch 1 sc same stitch
sc across
Row 5
ch 1 sc same stitch
sc next stitch
sc2tog
Row 6
ch 1 sc same stitch
sc across
Row 7
ch 1 sc same stitch
sc2tog
Row 8
ch 1 sc same stitch
sc across
Row 9
ch 1 sc2 tog
Fasten off Leaving long tail for sewing
Size 3-6 months
Ch 7
Row 1
sc in second ch from hook
sc across
Row 2
ch 1 sc in same stitch
sc across
Row 3
ch 1 sc in same stitch
sc next 3 stitches
sc2 tog
Row 4
ch 1 sc same stitch
sc across
Row 5
ch 1 sc same stitch
sc next 2 stitches
sc2tog
Row 6
ch 1 sc same stitch
sc across
Row 7
ch 1 sc same stitch
sc next stitch
sc2tog
Row 8
ch 1 sc same stitch
sc across
Row 9
ch 1 sc same stich
sc2 tog
Row 10
ch 1 sc same stitch
sc across
Row 11
ch 1 sc2tog
Fasten off Leaving long tail for sewing
Size 6-12 months
Ch 8
Row 1
sc in second ch from hook
sc across
Row 2
ch 1 sc in same stitch
sc across
Row 3
ch 1 sc in same stitch
sc next 4 stitches
sc2 tog
Row 4
ch 1 sc same stitch
sc across
Row 5
ch 1 sc same stitch
sc next 3 stitches
sc2tog
Row 6
ch 1 sc same stitch
sc across
Row 7
ch 1 sc same stitch
sc next 2 stitches
sc2tog
Row 8
ch 1 sc same stitch
sc across
Row 9
ch 1 sc same stitch
sc next stitch
sc2 tog
Row 10
ch 1 sc across
Row 11
ch 1 sc same stitch
sc2tog
Row 11
ch 1 sc same stitch
sc across
Row 12
ch 1 sc2tog
Fasten off Leaving long tail for sewing
Toddler Sizes
Ch 9
Row 1
sc in second ch from hook
sc across
Row 2
ch 1 sc in same stitch
sc across
Row 3
ch 1 sc in same stitch
sc next 5 stitches
sc2 tog
Row 4
ch 1 sc same stitch
sc across
Row 5
ch 1 sc same stitch
sc next 4 stitches
sc2tog
Row 6
ch 1 sc same stitch
sc across
Row 7
ch 1 sc same stitch
sc next 3 stitches
sc2tog
Row 8
ch 1 sc same stitch
sc across
Row 9
ch 1 sc same stitch
sc next 2 stitches
sc2 tog
Row 10
ch 1 sc same stitch
sc across
Row 11
ch 1 sc same stitch
sc next stitch
sc2tog
Row 11
ch 1 sc same stitch
sc across
Row 12
ch 1 sc same stitch
sc2tog
Row 13
ch 1 sc same stitch
sc across
Row 14
ch 1 sc2tog
Fasten off Leaving long tail for sewing
Assembly
Fold shoe in half lengthwise lining up the open edges to keep the sides even
Sew a fin triangle to each side with the long straight edge against the body and the top of the triangle lined up with the point at the nose.
Turn the shoe inside out and sew up back seam. When you sew the back after attaching the fins it gives them a bit of curve and more of a rocket shape. When you do it in the other order, it’s more of a jet plane look. Which is cool in itself, but not what this pattern is supposed to be.
Weave in ends.
Optional
Add dimensional or puffy paint for traction on slippers that will be worn by children who walk. Keeps the kitchen floor from becoming an impromptu ice skating rink.
This pattern is (c) 2012 by Stacey Lynn. All rights reserved. Please do not redistribute in any form, written or electronic without giving me some credit and maybe a link.. Any items made from this pattern are yours to keep, give or sell. After all, you did the work.
No comments:
Post a Comment